Wednesday, January 30, 2013

Five Stretches You Should Perform Before Hiking

Five Stretches You Should Perform Before Hiking
By Tyler Guymon, DPT


Count me as one of those individuals who moved to Arizona for the weather! In fact, one of the main reasons I decided to relocate my family from the Northwest was the sheer amount of fun outdoor activities for the entire family. If you asked my kids, their favorite time of the year is summer because school’s out and they are little fish swimming in pools almost every day. Ask me, my favorite time of the year is our current season - winter. Winter, if you can even call it that in Arizona, is the best time for outdoor activities without the fear of melting in the hot Arizona summer sun.

Our favorite family activity in the winter, with easy accessibility, is hiking. As the rest of the country is pulling out their ski boots, my family is dusting off our hiking boots. While hiking is a great outdoor activity, you will want to take special care to stretch out your body, especially during your first few outings.

Stretching properly safeguards your body from injuries and makes certain your body is trail ready. Stretches are best done after five minutes of hiking when your muscles are warmed up. Stretching cold muscles is not effective and may cause muscle strains.

Here are 5 stretches that are extremely effective and appropriate for that weekend getaway on those trails. One quick reminder: an appropriate stretch should give you a little bit of a “pull” in the muscle, but should not be painful.


Standing Calf Stretch
  • Begin with a large step forward using a rock, pole, or something else sturdy for balance, if necessary.
  • With your back foot flat on the ground and pointing straight forward, slowly transfer weight onto the front leg until you feel the stretch in the calf of the back leg.
  • Hold this stretch for 20-30 seconds, release and repeat two or three times per leg.

Standing Hamstring Stretch
  • Place one foot on a rock or in front of you on the ground.
  • Keep your heel in contact with the surface and your toe pointed straight up.
  • Bend at your hips forward, while slowly moving your pelvis back away from your outstretched leg. Bend your other knee if needed.
  • You may want to use your hand to hold something sturdy for support – remember, this is a stretch, not a balancing exercise.
  • Keep your pelvis tilted forward and your upper body upright while leaning forward.
  • You should feel the stretch on the backside of your extended leg.
  • Hold this stretch for 20-30 seconds, release and repeat two or three times per leg.

Standing Quad Stretch
  • Stand on one leg, holding something solid if you need the balance support.
  • Bend your other knee and bring your heel toward your buttock.
  • Reach for your ankle with your hand, keeping your knees close together – do not allow your bent knee to swing out away from your body.
  • Stand up straight, you should feel a slight pull along the front of your thigh and hip.
  • Be careful not to strain your knee - the goal is not to touch your heel to the buttock, but rather to stretch your quadriceps.
  • Hold this stretch for 20-30 seconds, release and repeat on the other leg.

Standing IT band stretch
  • While holding on to a tree, pole or another sturdy object with your right hand, cross your left foot over your right, keeping your hips square to the front.
  • For the best stretch lean your hips toward the support structure as if you are closing a car door with your hips (in this example, your hips will slide to your right).
  • Hold a mild stretch for 20-30 seconds, release and repeat two or three times per leg.
  • Alternate your hand and leg for the other IT band.


Standing Back Extension
  • Start with your hands on your lower back.
  • Slowly arch backward while moving your hips forward as far as you can without discomfort.
  • Hold only for three seconds, and return to starting position.
  • Repeat five times.

There are many other stretches and variations to these stretches that would be helpful before you venture out on that hiking trip. Just remember stretching is an important element! Nobody wants to turn a beautiful day outdoors into a painful memory of an injury. Let us know by leaving a comment below if this post helps and what other stretches you enjoy before your hiking adventure.

Wednesday, January 23, 2013

When Should I See a Physical Therapist, and Will it Help?


As most of you know, Ryann and I are very involved in CrossFit Fury.  This blog was written for their blog, but we are posting it here, too, as it applies to all athletes and people exercising.  Whether you are involved with CrossFit, a local gym, or your own workouts in home, pain is pain, and AZOPT is here to help, regardless.  I hope you find this blog helpful, and if you have questions about specific problems you are having, leave us a comment or contact us directly.

When Should I See a Physical Therapist, and Will it Help?
By Teri Roberts, DPT
Sore? “Who Cares!”  Achy?  “No problem.”  Stiff?  “No big deal.” 

We…are Crossfitters.  If we did not like to “feel the burn,” we would still be working out at a local gym using elliptical machines and machine weights.  But when the feeling goes beyond the burn and enters into pain, or even worse – injury, how do you know if physical therapy can help?

First, let’s define physical therapy.  Physical Therapists are trained to find the biomechanical dysfunctions that cause pain and assess physical movements to make sure pain never occurs.  In other words, as highly trained healthcare professionals (most have a Doctoral degree), physical therapists will examine you and make a treatment plan that will help you with flexibility, strength, endurance, coordination, and/or balance.  First, this will help you “feel better” by reducing pain and swelling.  Then, and more importantly, physical therapy will work to increase your flexibility, strength, and endurance to ensure the injury never happens again.

Pain may be caused by weakness, tightness, or a muscular imbalance.  Sometimes pain is caused by a combination of all three.  These elements may cause inefficiencies within your workout, even if pain never occurs.  Here are a few key points to help determine your physical therapy needs:

You have no idea why something hurts
If the WOD is a 1,000 meter row and 300 air squats, we can expect your hamstrings and quadriceps to be sore.  Similarly, if the WOD is 50 kettle-ball swings and 25 pull-ups, your upper traps and lats will likely burn.  However, if the WOD is snatch and toes-to-bar, you should not feel pain in your lower back.  If you are feeling pain in a muscle group that should not be affected by the exercise, physical therapy can help determine the imbalance that may be causing that pain, and introduce you to stretches and exercises designed to eliminate the imbalance, thus ending the pain.

Pain persists longer than three days following a workout
Normally, the average person takes two or three days for sore muscles to start feeling better, especially if this person continues to stretch and workout.  Pain, or soreness, for any longer can mean an injury.  After completing a push-press workout, I felt intense pain in my lower back (an example of having no idea why something hurts).  After three days of moving, stretching, and stabilizing exercises, my pain was not subsiding.  I knew it was time to get scheduled for physical therapy, and yes, I will schedule time with my husband, Ryann, when needed.  With three days of manual physical therapy, I was feeling much better and able to complete my clean and jerk PR without an ounce of pain!

The same body part is injured twice over a few week time period
This is really a no-brainer.  By injuring the same body part twice, you are showing there is an imbalance or weakness that is causing your body to not exercise properly.  Let’s say you have hamstring stiffness a few days following tire pulls, but it goes away.  That’s great – this is what should happen.  But if the next couple times after tire pulls you have that same hamstring pain, you would be smart to have a physical therapist help identify and address the issue.  Soreness is good, it means you are working.  Pain is not, it means you are doing something wrong.  Do you really want to be in pain any longer?

The pain travels (i.e. lower back pain moves down your leg)
Pain should not travel.  If you had shoulder soreness after the rope climb and then wake up with soreness traveling down your arm, manual therapy may be warranted.  Same goes with lower back pain, it should not travel down your leg.  If this is the case, you are a great candidate for physical therapy.

You swear you are doing everything right, but changes are just not occurring
Maybe you are just not pushing yourself with weights or reps due to the fear of injuring or re-injuring yourself.  You could be compensating during lifts or technical movements because you are off-balance and unable to stabilize or move through your needed range of motion.  Physical therapy can assess these areas as well.  Physical Therapists are experts in motion who treat patients of all ages to reduce pain and improve or restore mobility and improve stability. 

While CrossFit is a physically demanding workout, it should not cause any more soreness or pain than a regular man’s workout.  Making sure you are CrossFit safe and CrossFit pain-free is a passion of Arizona Orthopedic Physical Therapy.  Let us know what you struggle with and we can perform a full body screen to see if your body is limiting your success.  Ryann is also available to meet you at the gym and observe you in action to help diagnose the issue or help develop a plan or progression to allow you to improve. 

Call us at (623) 242-6908 to schedule your FREE screen today!

Friday, January 18, 2013

Improve your Golf Swing and Avoid Injury With These Helpful Tips


Five Exercises to Avoid Injury and Improve your Golf Swing

As the cold air breaks this week and returns to nicer golf weather, the courses will be filled with eager golfers looking to take advantage.  But what can you do to avoid that dreaded injury that could sideline you during golf’s busiest and nicest season?  Further, what easy exercises can you do to strengthen your game?

Ryann Roberts, DPT
To answer these questions, we have enlisted Erica Dechowitz, future professional golfer and Ryann Roberts, DPT, AZOPT owner and physical therapist.  Erica is currently rehabbing arthroscopic knee surgery in her right knee with Ryann after a fluke shot in a bunker caused her knee to buckle improperly.  This golf-related injury could have happened to any of us, and probably would have ended worse for most of us.  Being in the best shape of her life at the time of her injury prevented Erica from a more serious injury, which would have affected her goal of qualifying for the U.S. Amateur this summer.

Erica Dechowitz
Your core – simply, your body minus your legs and arms - is the most important part of a strong golf game.  The power in your swing comes from your core and hips.  The ability to balance and shift your weight correctly through your swing comes from your core.  The strength to get through playing 18 holes of golf comes from your core.  According to Erica, “as long as you’re stable in the core, you can swing as hard as you want, and the ball will go straight.” 

After your core, the next important parts of your body are your quadriceps, hamstrings, and shoulders.  But as Erica told us, “you cannot just go to the gym and pick up weights without knowing what muscles you are working and why.  You will risk future injury or a worse golf game.”

With the help of Erica and Ryann, we are able to provide you with these five exercises that will strengthen the important parts of your body to help you avoid injury while hopefully improving your golf swing.  Try them, and let us know what you think in the comments section of this post!

Exercise #1 – Front Plank
Equipment Needed: None
Muscles Trained: This is an isometric (static) core exercise that will strengthen the abdominals, back, and shoulders.
Description: Put your body in a push up position with your body’s weight on your forearms, elbows, and toes and hold for 5 to 30 seconds.  There are many variations such as the side plank and reverse plank, which involve a higher degree of difficulty.  Make sure your butt stays neutral and does not sag below your hips or rise above your hips and that your core stays contracted throughout the exercise.
Reps:  Perform 5-10 daily
How will this translate into your golf game?  “The plank is a basic core strengthener that will help improve your balance during your swing,” says Erica.


Exercise #2 – Hip Flexor Stretches
Equipment Needed: Towel, if needed
Muscles Trained:  Your hip flexors, located on your upper thighs, just below your hipbones, which allow you to lift your knees and bend at the waist.
Description:  Begin by kneeling on your right knee (use a towel to cushion your kneecap, if necessary).  Place your left foot in front of you, bend that knee, and place your left hand on your left leg for stability.  Your right hand should be placed on your right hip, keeping you from bending at the waist.  Make sure your back is straight and your core is tight.  Sink, as if trying to touch your groin to your front heel, being careful not to extend your knee over your toe.  You should feel the stretch in your right hip flexor.  Hold this stretch for 30 seconds, and then switch legs and repeat.
Reps: 3-4 reps with each leg, 2 or 3 times per day
How will this translate into your golf game?  According to Ryann, “this stretch will reduce stress on your back and allow you to make complete turns while maintaining your stable base.”


Exercise #3 – Corner Pectoral Stretch
Equipment Needed: Two walls, usually behind a closed door
Muscles Trained:  This stretch works your pectoral (chest) muscles.  By altering the position of your arms, the stretch will focus on different parts of the chest muscles.
Description:  Stand facing the corner with your elbows at shoulder height.  Place your forearms, elbows, and hands against the wall with your elbow at a 90 degree angle.  Lean inward and hold for 15 seconds.
Reps:  6-10 reps daily
How will this translate into your golf game?  “This stretch helps to set your shoulders in the proper position giving you better shoulder mobility and rotation,” says Ryann.


Exercise #4 – Side Lying Shoulder External Rotations
Equipment Needed: none up to light weights
Muscles Trained:  This exercise promotes scapular (shoulder blade) movement and stability and reduces the risk of shoulder injuries.  Also strengthens the rotator cuff and the posterior deltoid.
Description:  With either no weight or a light dumbbell, lie on your side with the dumbbell in the hand of your upper arm.  Position your upper arm’s elbow against your ribs to avoid any other movement except external rotation.  Simply rotate your arm through the full range of motion, keeping your scapula (shoulder blade) retracted throughout the entire exercise.  Do not allow your elbow of the upper arm to drift away from your body.
Reps:  2 or 3 sets of 20 reps each arm daily
How will this translate into your golf game?  “Since the shoulder is a high mobility joint, this exercise will give you better shoulder stability improving the strength that will help you achieve better posture and scapular (shoulder blade) control.  Ultimately, this will assist your follow through and help with more consistent ball striking,” says Ryann.


Exercise #5 – Russian Twists
Equipment Needed: Medicine Ball, Bosu Ball
Muscles Trained: Core
Description: Stand with your feet shoulder width apart.  Hold a medicine ball with both hands and arms only slight bent.  Swing the ball over to the right hip and forcefully swing ball forward and around to your left side.  Reverse back in the opposite direction.  Keep your core tight to maximize proper usage of all muscles.  Once you become more advanced, you can do this exercise while balancing on a Bosu Ball.
Reps:  2-3 sets of 30 seconds daily
How will this translate into your golf game?  This exercise is Erica’s favorite.  She prefers this exercise on two Bosu balls flipped over with a personal trainer throwing the ball to her (for a better description, Tweet Erica directly @EricaDech).  Erica tell us “this exercise will strengthen your core, give you better endurance, and improve your ability to wind up and release through your swing for maximum speed and better ball striking.”


Erica Dechowitz has been golfing competitively since she was 15 years old, but has been on the golf course since she was a toddler.  After growing up in Pennsylvania and attending Kutztown University, Erica moved to Arizona in 2011 to train year-round.  She currently is working towards qualifying for the U.S. Amateur in August.  Erica’s favorite golf drill is to hit 5 balls with a club, and then hit another 5 balls with the same club, but with her eyes closed.  This drill forces her to really focus on her muscle memory and how her body feels throughout the swing.  Erica’s favorite golf course is Bulle Rock Golf Course in Maryland, which she golfed with her dad during a road trip after her high school graduation.  Keep up with Erica on Twitter @EricaDech.

Wednesday, January 16, 2013

Follow AZOPT's Client Mr. A Through Total Shoulder Replacement Surgery

Following AZOPT's Client Through Total Shoulder Replacement Surgery - Entry #1
January 16, 2013
  
Shoulder_Anatomy
The Core Institute
The shoulder is the most mobile joint in the body. It plays a major role in positioning your arm and hand through space. Most of us take for granted our shoulder movements throughout a normal day’s activities. Think about all of the activities that require lifting your arm – washing your hair, brushing your teeth, drinking a cup of coffee or water, driving a car, carrying groceries – the list can go on. That’s not to mention an active lifestyle that includes golf, pickle ball, or any other type of exercise. 

But what happens when the pain is so bad that the simplest daily activities cause the most severe pain? What happens when you can’t even wash your own back, or worse, clean up after using the toilet? This was the life of AZOPT client, Mr. A. Mr. A was faced with a choice – live with a shoulder overloaded with arthritis that caused pain in every movement or have total shoulder replacement surgery. 

This blog series, which we will update every 2 to 4 weeks, will follow Mr. A through his rehabilitation from total shoulder arthroplasty (TSA) of his left arm, and provide an accurate account of Mr. A's experiences. Interestingly, Mr. A came to Arizona Orthopedic Physical Therapy following TSA of his right shoulder. A natural left hander, Mr. A decided after successful rehab on his right shoulder to move forward with TSA of his left shoulder. His knowledge and experiences after having TSA on one shoulder will give us more perspective as he rehabs the other shoulder. 

-------------------------------------------------------

Surgery is always a last option, only to be considered after non-surgical treatments such as physical therapy and activity modification fail to provide sufficient relief. The clear path for Mr. A was TSA on his right shoulder in April, 2012. After at least ten years of worsening pain forced him to need help getting up and down out of bed and in and out of a chair, the ‘straw that broke the camel’s back’ was during a theatre production of Smokey Joe’s Café. Extensive choreography required the actors to raise their arms above their heads during various scenes. Mr. A was already limited driving his car and helping his wife around the house with cleaning and heavy lifting, but now he was being scolded by the director for not performing the choreography accurately, a move that Mr. A could not physically accomplish. 

Mr A, 73 years young, was an active young man. He is a retired auto worker who used to lift weights, golf, and swim. In his own words, “I am not a sit around type of guy, but my shoulders have forced me into this kind of lifestyle.” His main goal through both surgeries is to eliminate pain and increase his range of motion and functional strength allowing him to return to all activities without restrictions. Prior to his first surgery, he had full functional use of his shoulder, but did have decreased range of motion, decreased strength, and increased pain with activity. 

According to The Core Institute, “shoulder replacement surgery essentially involves replacement of the worn out joint surfaces. There are several shoulder replacement implant types which are designed to address different patient needs, anatomy, and arthritis type. Also, there are a myriad of factors that your surgeon will weigh in order to select the correct type of replacement which is best for your shoulder. What works well for one patient may not be the best choice for your shoulder.” (The Core Institute. Total Shoulder Replacement Surgery. Retrieved from http://www.thecoreinstitute.com/total-shoulder-replacement-surgery.html).

AZOPT did not begin working with Mr. A until after his right shoulder TSA. Therefore, we can only provide pre-surgery measurements of his left shoulder and post-surgery measurements of his right shoulder. Mr. A first arrived at AZOPT May 10, 2012, following his first surgery April 26, 2012. 

His range of motion measurements were as follows: 


Left
Right
Flexion
150°

60° with pain
Abduction
111°

External Rotation
72°

Internal Rotation
60°


After 5 months (or 59 visits) of physical therapy, Mr. A’s range of motion measurements were as follows: 


Left
Right
Flexion
150°
142°
Abduction
111°
120°
External Rotation
72°
73°
Internal Rotation
60°
65°


http://www.nursing411.com
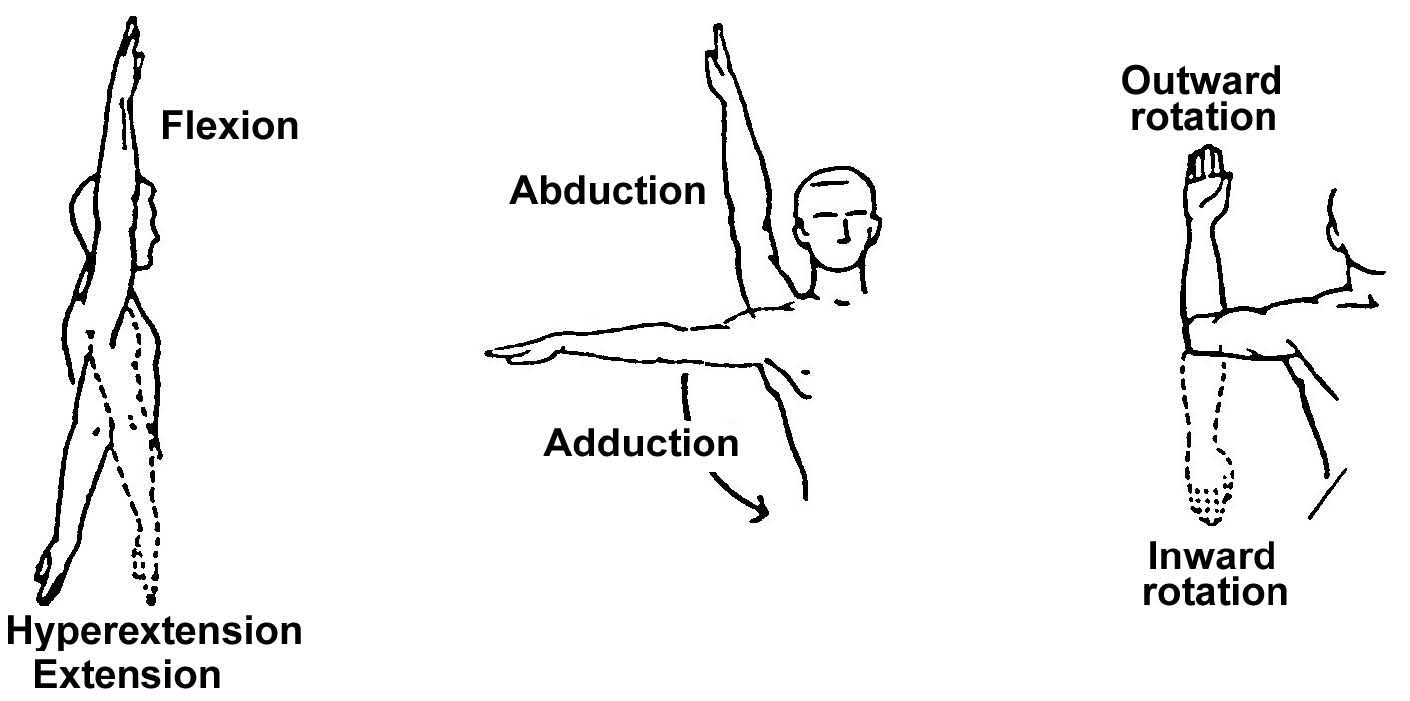
Flexion is the range of motion (ROM) measurement from lifting your arm straight forward from your hip to above your head. Abduction is the ROM measurement from lifting your arm straight from your hip out to the side and above your head. External rotation is the ROM measurement with your elbow at 90 degree, rotating your hand outward. Internal rotation is the ROM measurement with your elbow at 90 degrees, rotating your hand inward. These measurements translate directly to functional activities – washing your hair, tucking in your shirt in the back, putting away dishes in the cupboard. Generally speaking, a healthy range of motion would be 160 degrees flexion, 170 degrees abduction, and 90 degrees external and internal, although this does vary person to person. 

On September 28, 2012, Mr. A was discharged, knowing he would be having TSRS on his left shoulder, and would be back in physical therapy to rehabilitate both shoulders following surgery. Prior to his second surgery, Mr. A stated his left shoulder currently had pain levels at a 7 out of 10, with 0 being no pain and 10 being the highest amount of pain. He felt his right shoulder was approximately 80% rehabilitated. His sleep patterns cause him the most pain, as he changes sides constantly throughout his sleep, waking up two to three times each night. 

Mr. A had TSA surgery on his left shoulder on Thursday, January 10. Surgery was done by Dr. Jason Scalise, from The Core Institute. AZOPT Physical Therapist Doug Lehman, PT, who will be Mr. A’s therapist, watched the entire surgery over the shoulder of Dr. Scalise. Check out the next entry, which will discuss the surgery, the immediate care following the surgery, and the rehabilitation plan moving forward. 

We would like to hear from you: 
  1. What would you like to know about this procedure and the rehabilitation process? 
  2. Which of your daily activities are you experiencing pain? 
  3. How is pain affecting what you would like to accomplish in your day?